
Let's be honest, that cloudy, opaque ice from your standard freezer tray is doing your cocktails a disservice. Upgrading your ice is about so much more than just looks—it's about respecting the drink.
Top bartenders and home mixology nerds obsess over clear ice for one simple reason: it protects the integrity of the cocktail.
Why Your Cocktails Deserve Crystal-Clear Ice
Unlike its cloudy counterpart, properly made clear ice is dense and almost entirely free of the trapped air bubbles that make regular ice melt so quickly. That slow-melting quality is what we're after.
It’s the key to ensuring your carefully mixed Old Fashioned or Negroni stays perfectly chilled without becoming a watered-down mess after just a few sips. Cloudy ice, full of tiny fractures and impurities, melts in a flash and dilutes the spirit, completely changing the flavor profile the distiller or you, the bartender, intended.
The science behind it is actually pretty straightforward:
- Standard ice trays freeze from all directions at once—top, bottom, and sides. This aggressive freezing traps air and minerals right in the center, creating that familiar cloudy core and a much weaker structure.
- Directional freezing, the method we're going to master, puts you in control. By insulating the sides and bottom of a container, you force the water to freeze slowly from the top down. This process methodically pushes dissolved gasses and impurities downward, leaving you with a flawless, glass-like block of ice on top.
Before we dive into the "how-to," let's quickly summarize why this is such a game-changer for your drinks.
Clear Ice vs Cloudy Ice: A Quick Comparison
The table below breaks down the essential differences between ice made with directional freezing and the standard stuff you get from a regular tray. It highlights just how much of an impact your choice of ice can have on the final cocktail experience.
| Attribute | Clear Ice (Directional Freezing) | Cloudy Ice (Standard Tray) |
|---|---|---|
| Appearance | Crystal-clear, transparent | Opaque, cloudy center |
| Density | High-density, solid structure | Low-density, full of fractures |
| Melting Rate | Very slow | Fast |
| Dilution | Minimal, controlled | High, rapid |
| Flavor Impact | Pure, no added taste | Can impart off-flavors from trapped impurities |
| Best For | Spirit-forward cocktails (e.g., Old Fashioned, Negroni) | Shaking cocktails, general cooling |
As you can see, the benefits of clear ice go far beyond simple aesthetics. It's a functional upgrade that directly impacts the quality and enjoyment of your drink from the first sip to the last.
The core advantage is simple: denser ice melts slower. Slower melting means less dilution, which allows the complex flavors of your spirit to shine through. This is precisely why learning how to make clear ice is a non-negotiable skill for anyone serious about home bartending.
This isn't just a niche hobby anymore; it’s a movement. The global market for clear ice makers was valued at USD 7.86 billion in 2024 and is projected to keep climbing, which shows just how much people are starting to care about a better drinking experience. Making the switch elevates your home bar, transforming a good drink into a truly exceptional one.
The Science Behind Directional Freezing
The secret to flawlessly clear ice isn’t about using fancy bottled water. It’s actually much simpler: you just need to control the direction the water freezes. This is the entire concept behind directional freezing.
Think about how a lake freezes over in the winter. It doesn't just turn into a solid block of ice overnight. Instead, a layer of ice forms on the surface and gradually gets thicker, freezing from the top down. As those ice crystals build, they naturally push away any dissolved minerals, trapped air bubbles, and other impurities.
This process forces all the "cloudy stuff" down into the unfrozen water below, which is why the top layer of lake ice is often remarkably clear. Directional freezing for cocktails is just our way of recreating that natural phenomenon right inside a home freezer.
How Directional Freezing Beats Standard Ice Trays
Your standard plastic ice cube tray is the enemy of clear ice. When you stick one in the freezer, the cold air attacks the water from all sides at once—the top, the bottom, and all four sides. It’s a full-on assault.
This rapid, multi-directional freezing gives the impurities nowhere to escape. They get trapped right in the center as the last bit of water turns to ice, creating that familiar cloudy, weak core. It's why standard ice cubes are not only ugly but also crack easily and melt way too fast in your drink.
The Key Takeaway: Standard trays trap impurities by freezing from all sides at once. Directional freezing forces water to freeze from a single direction, methodically pushing those impurities away from the ice you actually want to use.
Making great ice at home is all about understanding this basic science. By freezing water slowly and in one direction, you give the impurities a chance to get out of the way, leaving you with pristine, clear ice on top. If you want to see this in action, you can check out this visual guide to better understand the process.
The Role of Insulation in the Process
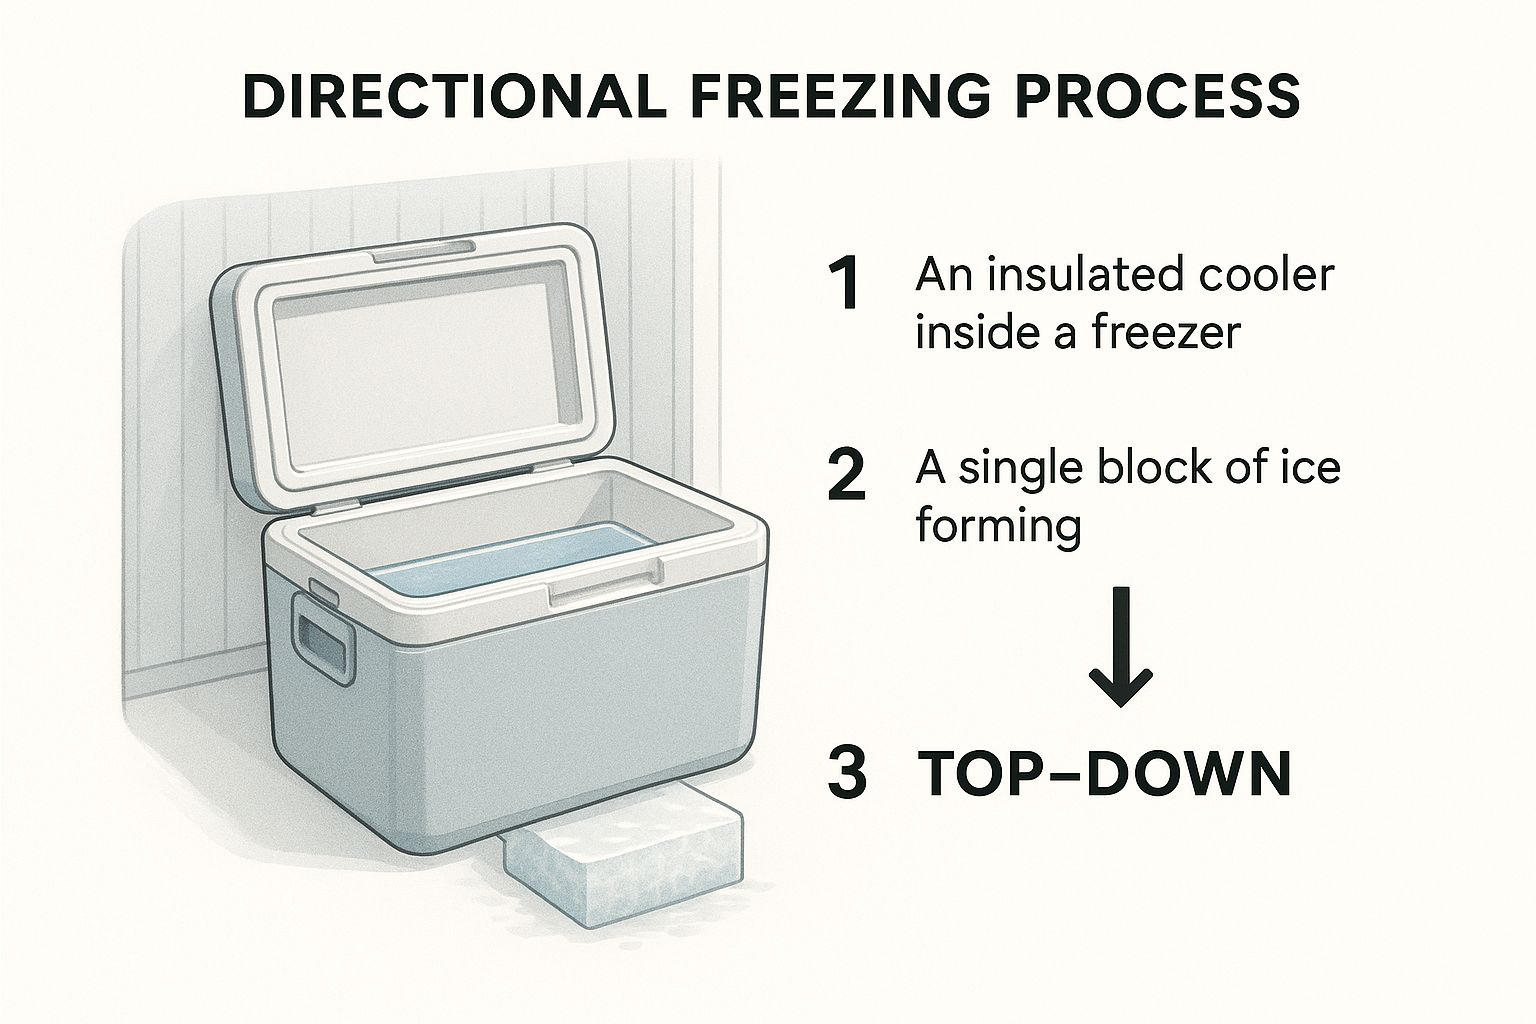
To pull off directional freezing, you need an insulator. This is where a small, hard-sided cooler—yes, like the one you'd take to the beach—becomes your secret weapon. By placing an open container of water inside an insulated cooler and putting the whole setup in your freezer, you’re shielding the water on the bottom and sides from the intense cold.
The cooler's insulated walls prevent the water from freezing from the sides or the bottom up. That leaves only one surface exposed to the cold air: the top.
- Insulation: The cooler walls shield the water from the freezer's cold.
- Exposure: Only the top surface of the water is left open to the cold air.
- Result: The water begins to freeze slowly, from the top down, just like a lake in winter.
As this top-down freezing front moves deeper, it systematically pushes dissolved air and minerals downward. Once you stop the process at the right time, you can harvest a thick slab of perfectly clear ice from the top, leaving a cloudy, ugly block of trapped impurities at the bottom. You just toss that part out. Mastering this simple principle is the first and most important step toward making bar-quality ice at home.
Making Clear Ice with The Cooler Method
This is where all that science about directional freezing gets put into practice. The cooler method is, without a doubt, the most accessible and reliable way to make a big block of glass-like ice with gear you probably already have. Forget about fancy, expensive gadgets; a simple, hard-sided picnic cooler is your new best friend.
You’ll want a small cooler, one that can actually fit inside your freezer. Something in the 5 to 9-quart range is usually the sweet spot. It's crucial to use a hard-sided model, as its insulation is the key to forcing the water to freeze from the top down, which is exactly what we want.
Setting Up Your Ice Block
With your cooler in hand, the setup is laughably simple. You can skip the myths about needing special filtered or boiled water—regular old tap water works just fine. The magic is in the directional freezing process itself, which does all the purifying for you.
Fill the cooler about three-quarters of the way with water, leaving enough room at the top for expansion as it freezes. Then, place the cooler in your freezer without the lid. You can also just leave the lid cracked open. The goal is to leave the top surface of the water exposed to the cold air, which kickstarts that top-down freeze.
This is what’s happening inside the cooler as it sits in your freezer:
As you can see, the insulated sides of the cooler prevent the water from freezing from the outside in. Instead, the cold air hits the top surface, and the freezing begins there, slowly working its way down. All the impurities and trapped air bubbles get pushed downward into the remaining liquid water.
Timing and Monitoring the Freeze
Now for the hard part: waiting. The exact timing will depend on your freezer's temperature and the cooler's size, but a good window to shoot for is somewhere between 24 and 36 hours. The most important thing to remember is that you need to pull the cooler out before the entire block is frozen solid.
The easiest way to check is just to look at it. You're aiming for a thick, crystal-clear layer of ice on top with a layer of cloudy, unfrozen water still sloshing around underneath. If the whole thing is a solid, cloudy brick, you waited too long. If it's just a thin sheet of ice on top, it needs more time. It might take a try or two to find the perfect timing for your setup.
Don't aim for a completely frozen block. The goal is to harvest the top clear layer and discard the bottom cloudy portion. If it freezes all the way through, the impurities will get trapped at the bottom, making separation difficult.
Harvesting Your Clear Ice Block
Once the block is ready, it's time for the most satisfying part. Take the cooler out of the freezer and let it temper on your countertop for 5 to 10 minutes. This just allows the outside of the ice block to melt slightly, helping it release from the cooler walls.
After a few minutes, carefully flip the cooler upside down over a cutting board or a rimmed baking sheet (to catch the water). The ice block should slide out with a solid thud. If it’s being stubborn, just give it a few more minutes. Don't try to bang it out.
You’ll be left with a gorgeous block of ice that’s perfectly clear on top with a distinct, cloudy layer on the bottom. That bottom section is where all the trapped air and minerals ended up.
- Top Layer: This is your prize—a dense, flawless slab of clear ice.
- Bottom Layer: This cloudy, brittle section is full of impurities and should be discarded.
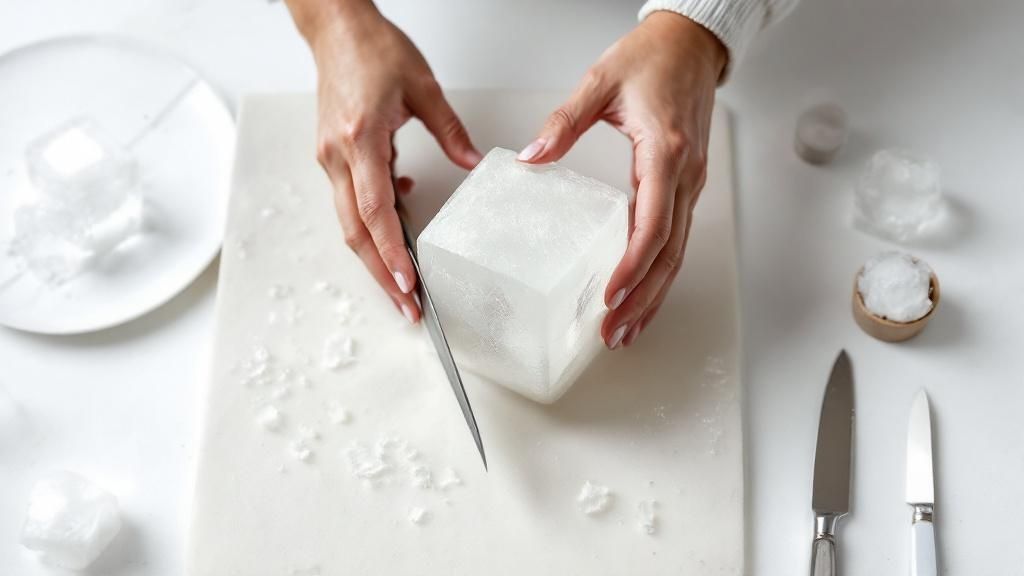
To separate the two, grab a serrated knife (a bread knife works great) and score a line right along the division where clear meets cloudy. Set the knife into that groove and give the back of the blade a firm but gentle tap with a mallet or even the back of a heavy spoon. The block should split cleanly along your score line, leaving you with a perfect slab of clear ice, ready for cutting into cubes.
Shaping and Storing Your Perfect Ice
You’ve done the hard work and harvested a beautiful, transparent slab of ice from your cooler. This is where the real fun begins—transforming that raw block into jewel-like cubes, elegant spears, or any custom shape that will elevate your glassware and cocktails.
This part of the process takes a little patience and the right tools. One of the most effective and satisfying methods involves just a serrated knife and a mallet. The knife creates a clean, controlled fault line, and the mallet gives you the force for a perfect break.
Tools for the Perfect Cut
You don’t need a professional ice-carving studio to get stunning results. A few simple tools, some of which you probably already have in your kitchen, are all it takes to start shaping your ice like a pro.
Here’s a quick guide to the essential tools and how to use them.
| Tool | Primary Use | Pro Tip |
|---|---|---|
| Serrated Bread Knife | Scoring the ice block to create a clean break line. | Don't saw back and forth. Just press down firmly to create a deep groove. |
| Rubber or Wooden Mallet | Tapping the spine of the knife to split the ice. | Use gentle, firm taps rather than one heavy blow to avoid uncontrolled shattering. |
| Ice Pick | Creating fine details or breaking down smaller pieces. | Great for shaping spheres or creating a more rustic, hand-carved look. |
| Clean Towel | To place under your cutting board for stability. | This also helps absorb excess water and prevent your block from sliding. |
With these tools in hand, you’re ready to get started.
First, let your big ice block sit on the counter for a few minutes to temper. This step is crucial; it slightly warms the surface, making it far less brittle and prone to cracking when you start working on it.
Once it's tempered, score a deep line where you want to make your first cut. Place the blade of your serrated knife into that groove and give the back of it a few firm taps with your mallet. The ice should split cleanly right along your scored line. Just repeat this process to create cubes or spears of your desired size.
Safety First: Always work on a stable, non-slip surface like a cutting board placed on a towel. Wear protective gloves to prevent your hands from getting too cold and to improve your grip on the ice.
Alternative Method: Dedicated Ice Molds
If the cooler method and hand-carving feel like a bit too much effort, dedicated clear ice molds are a fantastic alternative. These systems use the exact same directional freezing principle but in a compact, purpose-built container that molds the ice into specific shapes—usually 2-inch cubes or spheres—as it freezes.
They definitely offer a few key advantages:
- Convenience: Just fill with water and stick it in the freezer. There's no cutting involved.
- Consistency: Molds produce perfectly uniform ice every single time.
The trade-off? They typically produce far fewer cubes per cycle than a cooler block does. If you’re just making a couple of drinks for yourself, a mold is perfect. But for a party, a hand-carved block from a cooler will yield much more ice.
Of course, if you want the highest quality without any of the work, you can always explore options for professionally made, premium clear cocktail ice blocks delivered right to your door.
Proper Storage for Lasting Clarity
Once you’ve cut your ice, storing it properly is the final, critical step. If you just toss your pristine cubes back into the freezer uncovered, they’ll absorb any off-flavors from nearby foods—think frozen fish or leftover garlic bread. Not ideal for an Old Fashioned.
Place your finished cubes or spheres in a sealed, airtight freezer bag or a lidded container. This protects them from picking up weird odors and also prevents them from shrinking over time due to sublimation. Stored correctly, your clear ice will stay perfect for weeks, ready for your next cocktail creation.
Troubleshooting Common Clear Ice Problems
Even when you follow the steps for directional freezing to the letter, you might still run into a few frustrating snags. Don't sweat it. These are common speed bumps on the path to mastering clear ice, and thankfully, each one has a pretty straightforward fix. Most of the time, the culprit is either your freezer's temperature or your timing.
Let's walk through the most frequent setbacks and get your process dialed in for flawless results.
Why Is My Ice Still a Little Cloudy?
So you followed the cooler method, but the top layer of your ice block isn't perfectly transparent. Instead, it’s got faint white plumes or a slight haze. This is almost always a sign that your freezer is too cold, forcing the water to freeze too quickly.
When the freezing process gets rushed, it doesn't give the dissolved air and minerals enough time to get pushed down into the cloudy layer. A few bubbles get trapped in the clear section, creating that subtle cloudiness. The fix? Try turning your freezer temperature up a bit—from 0°F to maybe 5°F (-18°C to -15°C)—just to slow things down.
The Entire Block Froze Solid
You pull your cooler out of the freezer, and it’s a solid, heavy brick of ice. The top is clear, but it's fused to a cloudy block below. This one’s simple: you just left it in the freezer for too long. The whole point is to stop the process while there's still a layer of liquid water at the bottom.
If the entire thing freezes, all those impurities get trapped and locked in place. That makes it nearly impossible to separate the clear part from the cloudy mess.
For your next attempt, start checking on the cooler a few hours earlier. A typical 24–36 hour window can vary a lot, so begin peeking around the 20-hour mark to find the sweet spot for your specific freezer.
Making perfect ice is a game of small adjustments. While it might feel frustrating at first, learning these nuances is key to understanding how premium cocktail ice elevates your drinking experience and getting consistent, beautiful results.
My Ice Cracks When I Pour a Drink Over It
This is probably the most startling problem. You place a perfect, glass-like cube in a glass, pour your favorite spirit over it, and crack! The cube shatters into a web of fractures. This dramatic failure is all about thermal shock.
Your ice is sitting at freezer temperature (around 0°F), while your room-temperature liquor is much warmer (around 70°F). When you pour the liquid over that super-chilled ice, its surface expands way too fast while the core stays frozen solid. The stress is too much, and it fractures.
Luckily, the fix is incredibly simple: temper your ice.
- Just let the ice cube sit on the counter or in the empty glass for 60-90 seconds before you pour anything over it.
- This little bit of time allows the surface temperature to rise slightly, which dramatically reduces the temperature difference.
A minute of patience is all it takes to prevent cracking and preserve that beautiful, crystal-clear aesthetic you worked so hard to achieve.
Frequently Asked Questions About Clear Ice
Even with a solid guide, you're bound to run into a few questions as you get the hang of making clear ice. Let's walk through some of the most common hurdles and myths I hear about. Think of this as your go-to troubleshooting guide for getting those perfectly clear, glass-like results every single time.
Do I Really Need to Use Distilled or Boiled Water?
Honestly, no. This is one of the most persistent myths out there, but the truth is, the type of water you use isn't the secret sauce.
While using distilled or boiled water won't cause any harm, it’s not the magic bullet for achieving perfect clarity. The real hero here is directional freezing—the slow, controlled process that pushes impurities and trapped air out of the ice as it solidifies. Your regular tap water will work just fine with the cooler method because the slow freeze does all the heavy lifting for you.
My Cooler Is Too Big for My Freezer. What Can I Do?
This is a classic problem, but don't worry, you don’t need to go out and buy a new, smaller cooler. The goal is simply to insulate the water on five sides, leaving only the top exposed to the cold air. You can easily mimic this setup with items you already have.
A standard loaf pan is a fantastic substitute. Just grab a thick towel, wrap it snugly around the bottom and all four sides of the pan, and pop it in the freezer. The towel acts as the insulator, forcing the water to freeze from the top down—exactly like the cooler method.
Elevate your cocktails without the effort. Wolfe and Kensington delivers handcrafted, crystal-clear ice right to your door in NJ, NY, and CT, ensuring every drink is a masterpiece. Explore our premium ice solutions today.