
Picture a high-end cocktail sitting in front of you. What’s the first thing you notice? It’s not the garnish or the fancy glass—it’s that single, flawless block of ice that looks like pure crystal. That’s the simple magic of transparent ice cubes, and it’s what takes a drink from just okay to truly exceptional.
The Striking Difference of Clear Ice
The difference between the ice from your home freezer tray and a perfectly clear cube is night and day. One is cloudy, brittle, and frankly, a little uninspired. The other is dense, pristine, and visually stunning. This isn't just about looks, though—it's about performance. The very structure that makes transparent ice see-through is what makes it so much better for your drinks.
Your everyday ice gets that cloudy look from trapped air bubbles and impurities that get flash-frozen right into its core. This chaotic structure creates weak points, which is why cloudy ice melts so fast and waters down your drink before you even have a chance to enjoy it.
Function Beyond the Form
Transparent ice cubes are the exact opposite. They’re created through a slow-freezing process that methodically pushes out gases and impurities, leaving behind a tightly packed, dense block of pure frozen water. This density is the secret to its incredibly slow melting rate.
A single large, clear cube can easily outlast a whole glass of its cloudy counterparts. It chills your drink perfectly without diluting it.
For top mixologists, clear ice isn't just a garnish; it's a critical ingredient. It ensures that the first sip of a cocktail tastes just as balanced and potent as the last.
This commitment to purity also means clear ice is completely flavorless. Cloudy ice often carries a subtle "freezer" taste from those trapped impurities, which can clash with the delicate notes in a premium whiskey or a craft gin. With transparent ice, the only flavors in your glass are the ones you put there on purpose.
Cloudy Ice vs Transparent Ice At a Glance
To really see the difference, it helps to put them side-by-side. The choice between cloudy and clear ice directly impacts your drinking experience—one diminishes the quality, while the other protects and enhances it.
This table breaks it down.
| Attribute | Standard Cloudy Ice | Transparent Ice Cubes |
|---|---|---|
| Appearance | Opaque, white, and often cracked. | Crystal-clear, smooth, and glass-like. |
| Composition | Contains trapped air and mineral impurities. | Pure H2O with minimal trapped gasses. |
| Melting Rate | Melts quickly, leading to rapid dilution. | Melts very slowly, chilling drinks efficiently. |
| Flavor | Can impart unwanted freezer tastes. | Odorless and tasteless, preserving drink purity. |
At the end of the day, mastering your ice is one of the final steps to perfecting your beverages. Understanding this fundamental difference is the first move toward creating bar-quality drinks, turning a simple glass of iced tea or a complex cocktail into something truly memorable.
Why Your Freezer Makes Cloudy Ice
Ever wonder why the ice cubes from your freezer always come out with that foggy, milky center? The answer is surprisingly simple, and it all comes down to how they freeze. Once you get this, you're on your way to making flawless, transparent ice cubes.
Think about a lake freezing over in the middle of winter. The cold air hits the surface first, causing the water to freeze slowly from the top down. This gradual process is called directional freezing, and it gives all the dissolved air and mineral impurities time to get pushed down and away from the freezing front. What you're left with is a gorgeous, crystal-clear sheet of ice.
The Freezer's Flawed Approach
Your home freezer does the exact opposite. Instead of a slow, directional freeze, it blasts frigid air at your ice tray from every angle—top, bottom, and sides. This is an aggressive, all-at-once approach that flash-freezes the water. Ice crystals start forming on all the outer surfaces at the same time and creep inward.
As the water freezes from the outside-in, all those microscopic air bubbles and mineral impurities get trapped. With no escape route, they're forced into the very last bit of water to freeze, creating a cloudy, brittle core. That cloudiness is literally a pocket of imperfections.
This pocket of trapped air and impurities is more than just an aesthetic problem. It creates a weak, fragile structure that shatters easily and melts way too fast, turning your drink into a watered-down disappointment.
The Science of Structural Integrity
The difference in strength between the two types of ice is massive. The slow-forming crystal lattice of clear ice is incredibly strong and dense. On the other hand, the chaotic, air-filled structure of cloudy ice is weak and porous. We dive deeper into this in our detailed comparison of clear vs. cloudy ice, but the main takeaway is that cloudy ice isn't just ugly—it's structurally inferior.
Because it's full of tiny fractures and air pockets, cloudy ice has a much larger surface area exposed to your drink. More surface area means a faster heat exchange, which means rapid melting and a watery cocktail. It’s why a glass of cloudy ice seems to vanish in minutes, while one large, clear cube can easily outlast your entire drink.
By understanding that your freezer's method is the problem, you now know the solution. To make transparent ice cubes, you don’t need fancy water—you just need to change the way it freezes. You have to mimic nature by forcing the water to freeze slowly in one direction, pushing all those impurities out of the final product.
Mastering Directional Freezing at Home
Now that you know why your freezer makes cloudy ice, it's time to learn how to outsmart it. The secret is to replicate nature's own process right in your kitchen. This technique is called directional freezing, and it’s your ticket to creating flawless, transparent ice cubes without any special equipment.
The most popular and effective approach is what's known as the cooler method. It’s a brilliantly simple, low-cost way to use basic insulation to make water freeze slowly from the top down—just like a lake in winter. This process naturally pushes air bubbles and impurities downward, leaving you with a perfect slab of clear ice on top.
Choosing Your Equipment
You don’t need much to get started. The star of the show is a small, hard-sided cooler, the kind you’d take on a picnic. A "Playmate" style cooler with a flip-top lid is perfect, but really, any small insulated box that doesn't have an airtight lid will work. You don't want a sealed lid, as it can build up pressure.
The ideal cooler is one that fits comfortably inside your freezer, leaving a bit of room around it for air to circulate. Even a simple styrofoam box can do the trick. The goal isn’t to stop the water from freezing, but to control the process—slowing it down and forcing the cold to attack the water from one direction only.
This image shows a great top-down view of how directional freezing works inside a cooler.
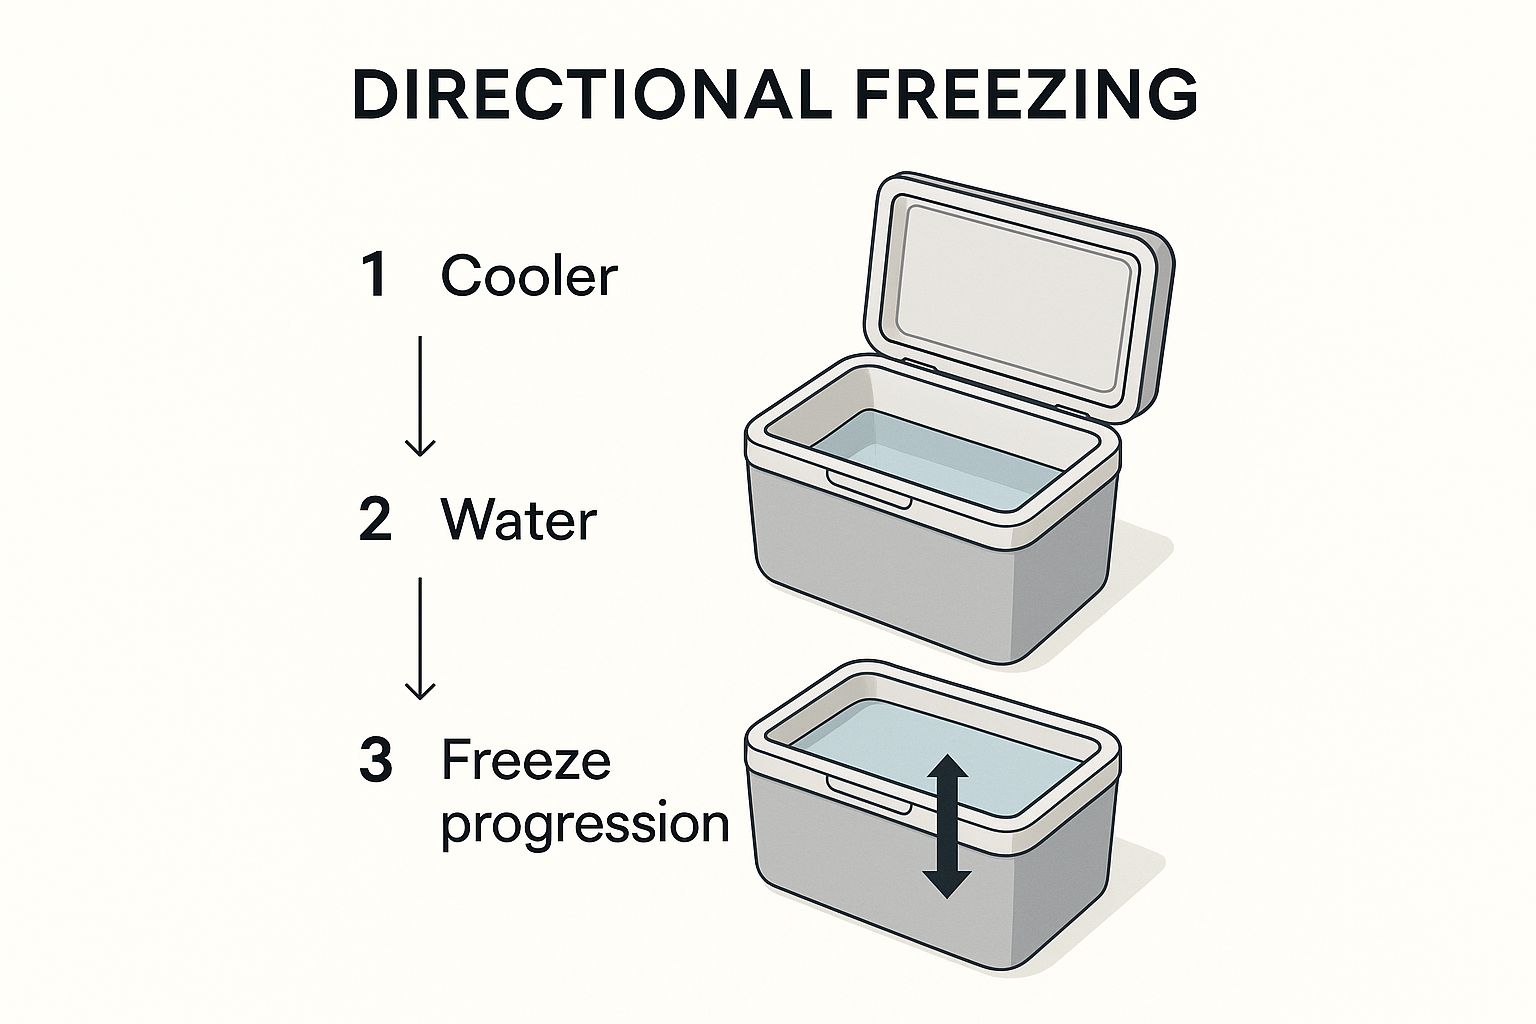
As you can see, the insulation on the sides and bottom shields the water, forcing the cold air to freeze it from the exposed top surface downwards.
The Cooler Method Step-by-Step
Ready to give it a try? It's easier than you'd think. Just follow these simple steps to harvest your first block of crystal-clear ice.
- Prepare Your Cooler: Set your small, hard-sided cooler on a level shelf in your freezer. You want it to be stable so it doesn't tip.
- Fill with Water: Fill the cooler about three-quarters full with regular tap water. One of the biggest myths about clear ice is that you need distilled or boiled water. You don't. The directional freezing process itself is what purifies the ice.
- Start the Freeze: Place the cooler in your freezer with the lid completely off or at least cracked open. This is the crucial step that exposes the water's surface to the cold, kicking off that top-down freeze.
- Be Patient: This takes longer than a standard ice tray—usually 24 to 48 hours, depending on your freezer's temperature and the size of your cooler. Check on it every so often.
- Harvest the Ice: Once you have a solid block on top (usually about 2-3 inches deep), you can pull the cooler out. You'll see a layer of cloudy ice and maybe some unfrozen water at the bottom. That's where all the trapped impurities ended up.
Carving Your Perfect Cubes
After harvesting your block, you'll have a pristine slab of clear ice on top and a cloudy, impure layer below. To separate them, let the block sit on your counter for about 10-15 minutes to temper. This simple step keeps it from shattering when you go to cut it.
From here, you can pour off any remaining unfrozen water and discard the cloudy bottom layer. A serrated knife (like a bread knife) and a small mallet or hammer are the classic tools for scoring and cleanly breaking the clear ice into perfect cubes. For a more detailed walkthrough, check out our complete guide on how to make clear ice at home.
The real beauty of this method is its simplicity. With just an inexpensive cooler and a little patience, you can consistently produce transparent ice cubes that will elevate every single drink you make.
So, you're ready to ditch cloudy, fast-melting ice for good? Now that you understand the magic behind directional freezing, it’s time to figure out the best way to make beautiful, transparent ice cubes at home. There are a few different paths you can take, and each one offers a unique balance of cost, effort, and convenience.
Choosing your method is a bit like picking out a coffee maker. You could go with a simple pour-over for total hands-on control, a French press for consistent results, or a fancy espresso machine for speed and automation. The right choice for your clear ice journey depends on your budget, how often you’ll be making cocktails, and how much work you want to put in.
Let’s walk through the three main options: the classic DIY cooler method, specialized silicone molds, and dedicated countertop clear ice makers.
The DIY Cooler Method
This is the tried-and-true, budget-friendly way to get your feet wet in the world of clear ice. As we covered earlier, all you need is a small, insulated cooler to mimic how lakes freeze from the top down. It’s surprisingly effective and costs next to nothing if you already have a simple picnic cooler lying around.
- Pros: It’s incredibly cheap and produces a big, beautiful block of high-quality clear ice. It’s proof that you don’t need expensive gadgets, just good technique.
- Cons: This is definitely the most hands-on approach. It eats up a lot of freezer space, takes a long time to freeze (often 24-48 hours), and requires you to manually harvest and cut the final ice block.
This method is perfect for the curious home bartender who wants to experiment without spending a dime or for anyone who just needs a large batch of clear ice for a party every now and then.
Specialized Clear Ice Molds
If you want the stunning quality of directionally frozen ice without the hassle of chiseling a giant block, specialized molds are a fantastic middle ground. These clever little devices are essentially mini-coolers designed to pop out perfect individual cubes or spheres. They usually consist of a silicone mold that nestles inside an insulated container.
These molds use the exact same directional freezing science as the cooler method but pack it into a more compact, user-friendly design. The insulation forces the water to freeze from the top down, pushing all the cloudy impurities into a separate reservoir at the bottom.
Once the water is frozen, you just pull the silicone mold away from the insulated base, pop out your flawless transparent ice cubes, and toss out the cloudy ice left behind. Easy.
Comparing Key Factors
| Feature | DIY Cooler Method | Specialized Molds | Countertop Machines |
|---|---|---|---|
| Cost | Lowest ($) | Moderate ($$) | Highest ($$$) |
| Effort | High | Low | Very Low |
| Speed | Slowest (24-48 hrs) | Slow (18-24 hrs) | Fast (Varies) |
| Convenience | Low | Medium | High |
| Ice Quality | Excellent | Excellent | Very Good to Excellent |
Countertop Clear Ice Makers
For the serious drink aficionado whose top priority is convenience, a countertop clear ice maker is the ultimate upgrade. These machines completely automate the process, typically by continuously circulating water over a freezing plate to build up layer after layer of pure, crystal-clear ice.
These machines are, without a doubt, the fastest and most effortless way to get a constant supply of transparent ice cubes. They work independently of your main freezer and can produce a fresh batch of ice in just a few hours, not days. While they are a significant financial investment, their convenience is unmatched for those who entertain often or simply can't be bothered with the manual methods. They deliver consistent, beautiful results on demand—a worthwhile luxury for any dedicated home mixologist.
Creative Ways to Use Transparent Ice
Sure, a flawless, slow-melting cube is the perfect partner for a glass of premium whiskey, but the potential of transparent ice cubes goes way beyond that. It's time to stop thinking of clear ice as just a way to chill a drink and start seeing it for what it really is: a blank canvas. Its crystal-clear nature is the ultimate medium for turning any beverage into a visual masterpiece.
This is where you get to have some fun. A single, large cube can transform a daily iced coffee or a premium tea into a small moment of luxury. The absolute clarity lets the rich colors of the brew shine, creating a presentation that feels deliberate and much more appealing. Even a simple glass of sparkling water feels more elegant with a perfectly clear spear or cube.
Elevating Everyday Beverages and Events
The real magic of clear ice comes alive when you start getting creative with infusions. Because the ice is completely transparent, anything you freeze inside becomes a stunning focal point. This opens up a whole world of possibilities for parties, special events, or just adding a personal touch to your evening drink.
Here are a few ideas to get you started:
- Floral Ice Spheres: Imagine freezing edible flowers like pansies or delicate rose petals inside large ice spheres. They add a beautiful, romantic touch to punches and cocktails, perfect for weddings and parties.
- Herb-Infused Cubes: Lock in vibrant herbs like mint, basil, or rosemary. These cubes add a subtle aroma and a pop of green to gin and tonics or craft sodas.
- Citrus Garnishes: A thinly sliced wheel of lemon, lime, or blood orange frozen inside a block of clear ice creates a spectacular—and functional—garnish that slowly releases its flavor as it melts.
The core appeal of clear ice lies in its visual purity and hygienic properties. Being free of trapped air and impurities not only makes it look better but also ensures it melts slower, preserving the beverage's intended flavor and temperature for longer.
Beyond the Glass: Culinary Applications
The usefulness of transparent ice cubes isn't just limited to what's in your glass. Professional chefs and caterers have known its value for years, especially in high-end culinary presentations. Its flawless look and slow melting rate make it the ideal choice for displays that need to stay pristine for hours.
Think about a seafood bar. A bed of crystal-clear ice keeps oysters and sashimi perfectly chilled without the cloudy, unappealing look of standard crushed ice. This simple switch ensures the focus stays entirely on the vibrant colors and textures of the food itself.
Ultimately, clear ice is about elevating the entire sensory experience, from sight to taste. You can learn more about how premium cocktail ice elevates your drinking experience in our other post. By mastering this simple but powerful ingredient, you can turn any occasion into something truly memorable.
Frequently Asked Questions About Clear Ice
Even after you've learned the ropes, a few questions always pop up when you start making your own transparent ice cubes. Don't worry, that's completely normal. Perfecting the art of clear ice usually involves a bit of trial and error.
This section tackles the most common questions head-on. Think of it as your go-to guide for troubleshooting any little issues and refining your technique for consistently flawless results.
Does Using Distilled or Boiled Water Make a Difference?
This is easily the most common question we get, and the answer usually catches people by surprise. While using purified water like distilled or boiled water might give you a tiny edge, the freezing method is far more important than the water itself.
The whole point of directional freezing is to physically push impurities and dissolved air out of the water as it solidifies. You'll get stunningly better results using regular tap water with the cooler method than you ever would by just freezing a standard tray of distilled water. Save yourself the time and effort—focus on how the water freezes, not what water you're freezing.
Are Countertop Clear Ice Makers a Worthwhile Investment?
This one really comes down to your lifestyle, how often you'll be using clear ice, and your budget. If you're a serious cocktail enthusiast, love hosting, or just can't beat the convenience, a countertop machine is a fantastic tool. It takes all the guesswork out of the equation, freeing up freezer space and giving you a ready supply whenever you need it.
For more casual use, the DIY cooler method or a specialized directional freezing mold can produce equally beautiful ice with just a bit more hands-on effort. It’s a classic trade-off: money for convenience.
How Do I Cut a Large Block of Ice into Cubes Safely?
Carving up a big block of clear ice looks intimidating, but it’s surprisingly simple and incredibly satisfying. The secret is to avoid "thermal shock," which is what causes pristine ice to crack and shatter.
- Temper the Ice: First, let your ice block sit at room temperature for about 10-15 minutes. This is a non-negotiable step. It lets the surface warm up just enough to handle the pressure of being cut.
- Score a Line: Grab a serrated knife (a bread knife works perfectly) and score a straight, shallow groove across the surface where you want the ice to split.
- Split the Block: Place the knife blade back in that scored line. Now, give the spine of the knife a few gentle but firm taps with a wooden mallet or the back of a heavy spoon. The ice will snap cleanly right along your line.
You can repeat this process to create perfect large cubes or elegant spears for Collins glasses. With just a little practice, you'll be carving your own transparent ice cubes like a seasoned pro.
Elevate your beverages with the purest ice available. For handcrafted, crystal-clear ice delivered directly to your door in New Jersey, New York, or Connecticut, explore the premium solutions from Wolfe and Kensington. Discover the difference at https://www.wolfeandkensington.com.